Showing posts with label interior design. Show all posts

Monday, November 2, 2015

Bathroom Getaway

Once again I have disappeared from the blogging world, but I am trying hard to make a comeback. I thought I would share with you guys one of my latest projects that was recently completed. 
The project features a small master bath spaces that the owners wanted to freshen up and add a hint of the tropics to their small space. Their inspiration for the desired outcome came from their honeymoon trip to Fiji. They wanted to feel that getaway sensation every time they stepped into their space. Another factor they wanted to focus on was giving their bathroom a modern touch.

Check out these before's:


And here is what I came up with...


I kept the walls cool yet bright and added darker elements to lend to the updated modern feel the clients were looking for. I also introduced subtle color that also gave a beach vibes and incorporated lots of rich texture through fabrics, tile, and the rug.

Here are some 3d views I created to present my design to my clients.


They loved it! As a part of any design process, there were changes that came up a long the way and elements that had to be place into phase two, but for the most part we were able to see the overall design through and I am loving the outcome. Take a look for yourself!


I love it. But what I love even more is how much THEY love it. Want to know a secret? This was a client I worked with online only! That's right. We did everything from start to finish via email. It can be done. I'd love to help with your next project either in person or as an e-client. Let's get started!


Tuesday, January 27, 2015

Coral + Turquoise: Fabrics to Inspire

Oh hello again! Long time no see, I know I know. I am awful. I've got to get better! But new year, new goals right?
I've got a very special project I am working on and will share all the details later but here is a little teaser of some of the fabrics I am pulling together. Cute huh?

Stay Tuned!


Tuesday, May 27, 2014

Levi's Nursery

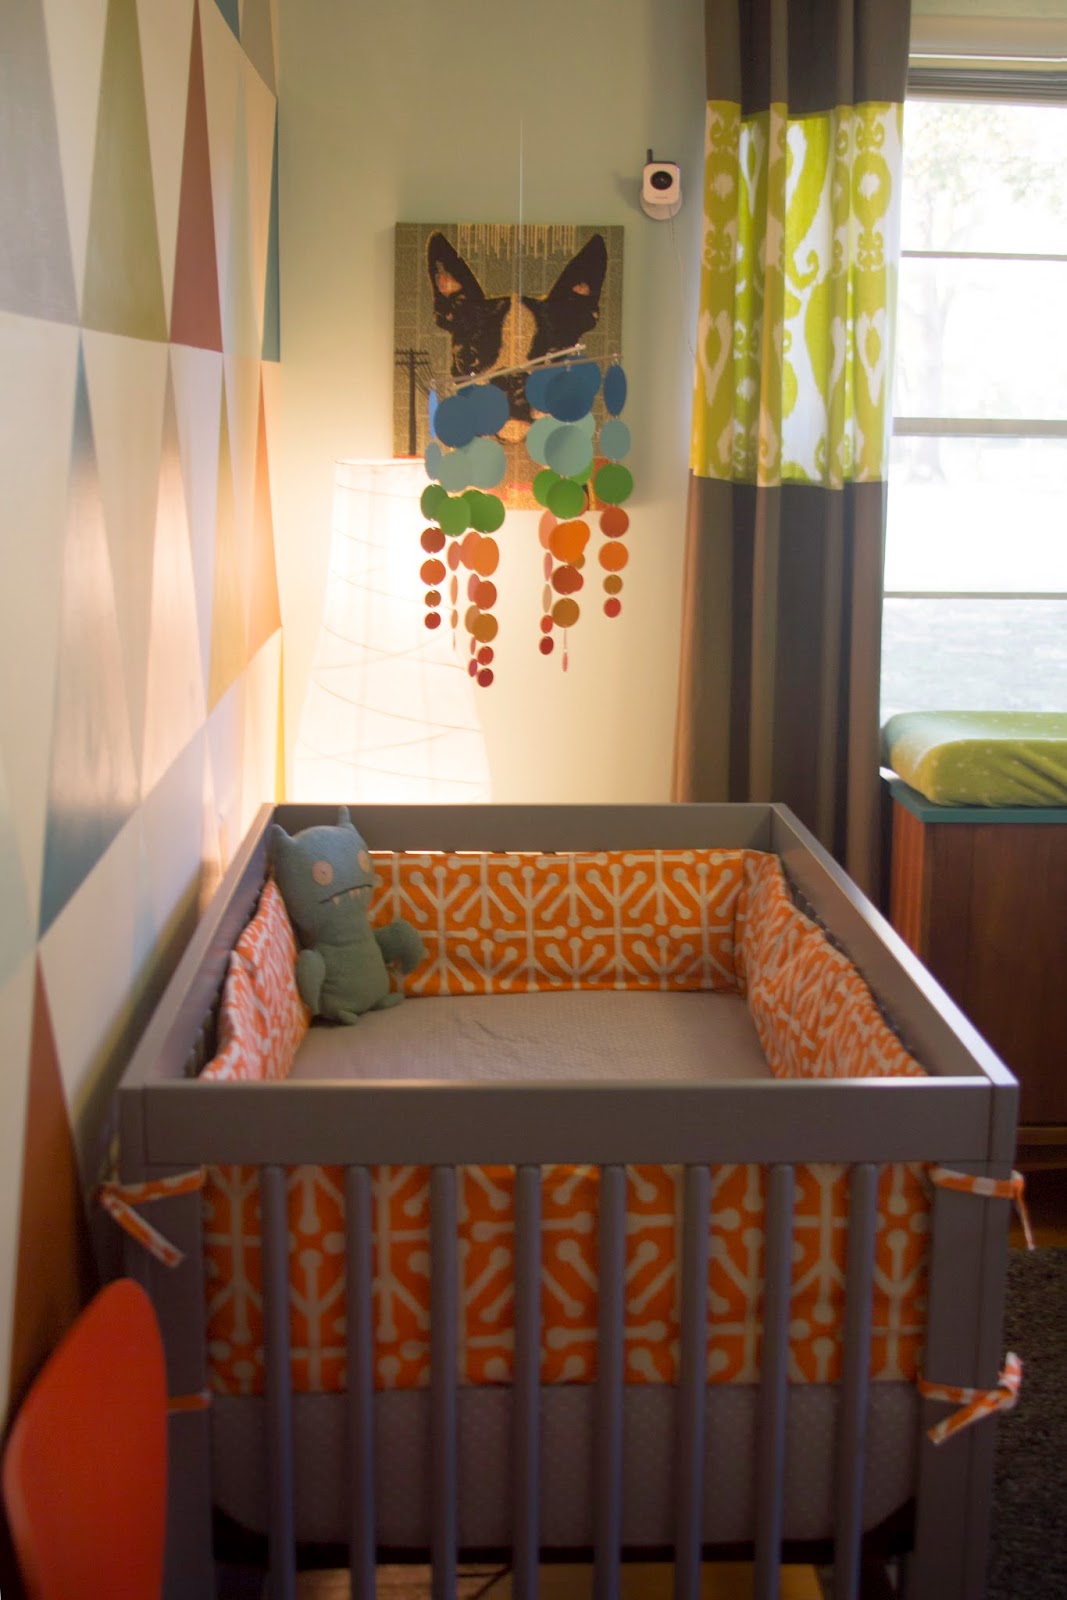
One of the most exciting parts of working on the house last summer was by far, designing and installing our baby's room. It was months in the making and something I've dreamed of and anticipated for years. I started getting the big pieces first and then worked on the color scheme, fabric selections, and wall graphic.  Art was also a big part of the space and I had a great time selecting just the perfect pieces. We also mixed in some sentimental pieces and gifts such as stuffed animals and books. All in all I feel like his room is a good mix of old meets new.  It's very "retro modern" and it came out exactly the way I dreamed of, if not even better.

This was my little design layout I came up with once I decided on the accent wall design and my fabrics. I also used it to brainstorm the color placement and where to put the fabrics I wanted to use.


So here's the plan....

My mom found this long bookshelf on the side of the road for free! We simply cleaned it up and painted parts of it in a shade of gray. The lamp was a thrift store find of my mother-in-laws and we covered the shade in a fun fabric that coordinated with the colors of the room, and the changing table was thrifted by my Mom. The top had been replaced by a piece of laminate so I painted it in the deep turquoise that we used throughout the room in accents. The panels were some I had from Ikea that we re worked with the green ikat fabric. The bumper pad was just a plain pad that my super Mom recovered with this great fun orange print fabric.
I love our crib. Its retro and modern and the color is perfect. The wall was not as hard as it looks! Here are some process pics...


The hardest part was determining the size of the triangles and drawing it out. After that I simply would tape off one color group at a time, paint them, and let them dry before going after the next group. It took about 2 evenings of work. The result was so worth it.

We got the rocker from Ikea. Its modern yet super comfy. We with the the white cushion and once again my super Mom stepped in and covered the existing cushion with our fabric. (seriously, what would I do without her?!)


The mobile was a kit we got off of Etsy.

How cool is this "diaper cake"?! Once again, thank Mom.


The bottom prints are from a great artist, Elouise Renouf from Nottingham, UK. Her work is very Mid Century and very cool. It was so hard to pick two!
The top print was created by my friends over at An Open Sketchbook. Suzanne and Edgar are uber talented designers and artists. Take a look at their work and you will be hooked. Suzanne was actually one of my professor's in design school! Here's a better picture from their site:

I love the idea of placing words of wisdom and good advice around him in his room. That inspired me to create a few pieces of my own, seen here below.


I love this space. Levi and I hang out in here everyday. I can't wait to watch him grow up in here.
And most importantly, Levi loves it too :)


Levi at 4.5 months
(Photos above by Pictures of Silver Photography) 

Levi at 6 months!


Friday, March 21, 2014

My Master Bedroom: Before & After

Our master bedroom was similar to the other bedrooms in the house, not much wrong but needed some color, the rim needed painting, and a more contemporary fan were among my top priority changes for the space. 

So here is the "Before": 


And here are the "Afters":


Personally, I love dark walls. I know the thought of a dark color on that paint swatch is intimidating, but it gives so much opportunity for drama, light, and contrast. All these elements make for a space full of interest. And dark walls in the bedroom means a dark space for sleeping... and I love to sleep! It's a very warm and comforting space. Everything in the room was transferred over from our old room in NC except for that long, tall mirror which was left in our "new" house and was actually made by the owner. They had it hanging horizontally in the den but it did not work there with our new configuration and I've always wanted a nice full length mirror in the bedroom, this one just happens to be an overachiever! I plan to have the window panels re-worked soon so that they hang from below the trim to the floor but that will be down the road. Can't do it all at once!


The dresser, chest, and nightstand were Matt's parent's. "Vintage" Stanley Furniture. ;) My night stand is a thrifted little Mid-Century piece that I revamped but I still to photograph that one! We stained our bed a few years ago to make it work better with our other pieces. We also added a more modern fan that or baby loves to watch ;) and the lamps are from Target. 


So here's what the floor plan looks like: 


You can see that we have lots of lamps and chose to have no over head light when we picked our new fan. I find that one overhead light usually is not the best choice in a bedroom and much rather have the option of have all my lamps on for bright light or be more selective with my light sources for a dimmer setting at night. 

This room is a bit bigger than our previous bedroom yet still on the smaller side in terms of a "Master". It is an older house though so it's to be expected. We plan to gut the bathroom (which is not pictures but is all pink!) as well as re-egineer the closet. We will work with what we have and push the space to it's full advantage. Stay tuned!